CSS navigation bar with stylish web2.0 elements
Design Tutorial
This navigation bar is using the web 2.0 colors, blue and green. The final result, which is shown below. The design tutorial is created in Adobe Fireworks!
- Create a new document, any size, but I prefer 800×600 pixels. Select the rectangle tool (or press U) and draw a rectangle, 300(w)x30(h) pixels.
- Select the rectangle and, in the properties toolbar, set background to Gradient -> Linear. Set the background line like I did on the image below and set the same colors.
- Now, draw another rectangle, 300(w)x1(h) pixels. Set its background to solid and color to #00CCFF. Place that rectangle, just above the first one.
- Then, draw another rectangle, 300(w)x3(h) pixels. Set its background to solid and color to #99CC00. Place the green rectangle, one pixel below the first one.
- Select the star tool (the same toolbar where you select rectangle tool) and draw a star, any size. Set its background color to #99CC00. Then move the points dot down, so you get three points, which is a triangle.
- Now, set the triangle’s size to 13 pixels of width and 5 pixels of height. After you set the size, place the triangle below the text you will write. I wrote Templates. Used font is Trebuchet ms, size is 16 and color is #99CC00. Blue text’s color is #00CCFF. Here’s the final result:
After we finished the design tutorial we need to create 2 simple images to style our CSS navigation bar: A background image (the light blue bar) and a transparent button that indicate the active state, all other elements are created with CSS.
Like in most CSS horizontal navigation bars an unordered list is used to hold the menu items:
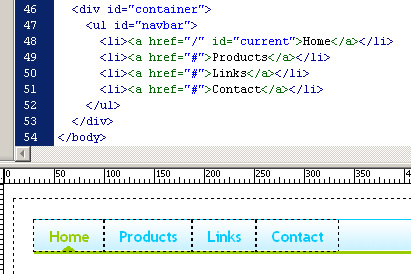
With the next CSS code it’s possible to style the horizontal navigation bar:
#container {
width:800px;
height:600px;
padding:20px;
}
ul#navbar {
background:url(/tutorials/web20_css_bar/backgr.jpg) repeat-x left top;
margin:0;
border-bottom:3px solid #98CB00;
border-top:1px solid #00CCFF;
list-style-type:none;
height:31px;
}
ul#navbar li {
float:left;
}
ul#navbar li a {
display:block;
padding:5px 15px 4px;
font:bold 16px "Trebuchet MS";
text-decoration:none;
color:#00CCFF;
letter-spacing: -0.1em;
}
ul#navbar li a:hover {
color:#98CB00;
}
ul#navbar li a#current {
background:url(/tutorials/web20_css_bar/current.gif) no-repeat center bottom;
color:#98CB00;
}
We placed the background image behind “ul” element and added the two borders to the top and bottom. The li element is defined as a floated block element and got some padding to create a bigger button. The last definition is for the current state, which will show up the tri-angle. You need some server-side code (php) to get a dynamic position every time a different page is loaded.
Published in: Website Development
Nice tutorial, Olaf.
It’s really great that you wrote the process of “exporting” the menu into a website. The code is simple and the result is great. Of course, thanks for using my tutorial in yours. :)
Nice, great job. It would alsov be nice if you could upload a working example on some server so we could see ti in action :)
if you place padding:0; into the ul#navbar definition it will correct the extra blank space that is generated when this is viewed in firefox (my version is 2.0.0.3)