Dynamic sidebars and widget logic
In the first part of this series I explained how to build a WordPress theme from scratch. Today I will show you how I use widgets and dynamic sidebars in a more efficient and flexible way.

About widgets and dynamic sidebars
Widgets are small modules or snippets you can place into the sidebar or any other widgetized area from your WordPress website. You can find a selection of “standard” widgets via the WordPress backend: Appearance » Widgets.
Before you can use any widget you need to define a widget area somewhere in your WordPress theme. We did this already in the first article of this series. You can use “normal” widgets several times in your dynamic sidebar, for example the text widget. Use multiple instances of the text widget to add content or HTML code to your sidebar or widget area.
How about troubles while using widgets?
Most of the default widgets are not very powerful: you can’t customize them and there are no options for custom CSS classes or IDs. I tried several widgets from the WordPress repository and some of them have more features than I really need. For example, if you like to place a single image inside the sidebar you can use the default text widget or you can use some special image widget. The problem is that the widget will generate much more code than just for the image. The solution is a custom widget.
Custom widgets
For previous projects I wrote custom widgets from time to time, but not very much. A more advanced widget needs much more development time than using the same PHP function in your sidebar file (so you understand why I used not so much widgets in the past). If you need a simple widget and you need the widget only once inside a widget area, you can use this simple code to show a simple image.
function contact_image() {
	echo '
	<div class="sidebarimage">
		<img src="'.get_bloginfo('template_url').'/images/contact.jpg" alt="Contact" />
	</div>';
}
$widget_ops = array('classname' => 'contact_image', 'description' => 'A widget that shows an image' );
wp_register_sidebar_widget('contact_image_id', 'Contact image', 'contact_image', $widget_ops);
The difference between a “simple” widget and normal widgets is that you can use them only once in your dynamic sidebar and they have no options. For these options or support for multiple instances, you need to extend the widget class. This article from the WordPress codex will show you how.
Other solutions to create your own widget elements
- A very simple method is to create a shortcode for the HTML structure you need in your sidebar.
function create_banner() {
	return '
	<a href="https://www.web-development-blog.com/out/webfaction">
		<img src="https://www.web-development-blog.com/wp-content/uploads/2012/05/banner-hosting.jpg" alt="Smarter Web Hosting" />
	</a>';
}
add_shortcode('createBanner', 'create_banner');
Activate a text widget and add this shortcode into the content area:
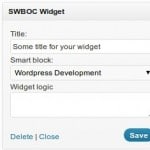
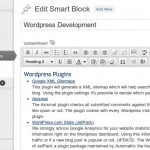
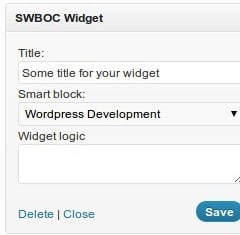
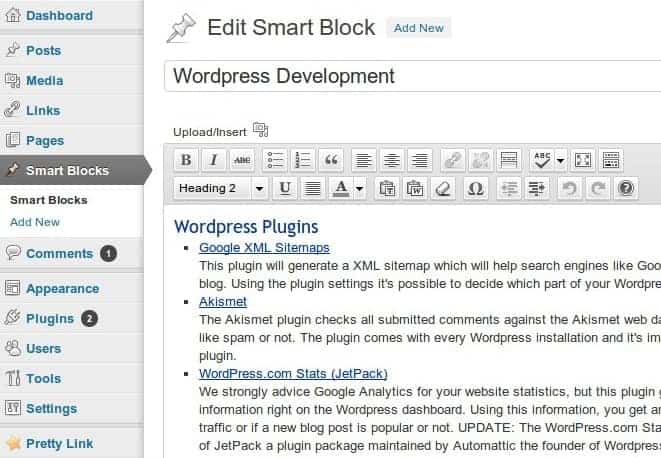
[createBanner]. If the shortcode isn’t processed in your text widget, you need to add this filter in your functions.php file:add_filter('widget_text', 'do_shortcode'); - Another very effective and comfortable solution is the Smart WYSIWYG Blocks Of Content plugin form Coen Jacobs. The plugin creates a custom post type and you can add your content while using the native WYSIWYG interface. Using a special widget, you can place these posts in your dynamic sidebar.


- If you need a list of pages or posts in your sidebar, it’s very effective to create a custom menu (Appearance » Menus) for these listings. Using the “standard” menu widget you can place that list in your dynamic sidebar.

Conditions for your widgets
Of course you don’t like to show every widget for every page on your WordPress website. Or better some of your widgets have to show-up only once. Inside each theme file you can use WordPress conditional tags, but for the widgets you need to use a plugin. Widget Logic is the plugin I’m using since several years, to add conditional tags to my widgets:
is_page('contact')Show the widget only on the page with the slug “contact”!is_page(array('contact', 'faq')) && !is_404()Don’t show this widget on these two pages and not on the 404 error pagehas_term('service', 'page-type') || is_404()Show this widget only on pages (or posts) where the taxonomy ‘page-type’ is equal to “service” or whenever it’s a 404 page. Using a custom taxonomy is a great way to show / hide widgets without to enter every single page or post.
These are just a few examples on how to use WordPress conditional tags to show or hide your widgets, a few others are: is_home(), is_post('some-slug') or is_category(). Search the WordPress codex for “Conditional Tags” to find more.
In the next article of this series I will show you how to use a custom post type to create a FAQ page.
Published in: WordPress Development