How-to setup the DNS for a DirectAdmin web server
Maybe you have had enough of the unreliable service that often comes with shared hosting. Or maybe your monthly bandwidth costs are just too high. Whatever the reason that you are planning to move to your own Linux web server, you are going to need to know how to set up the DNS to create your own nameserver(s) and DNS Zone. To setup your own DNS, you will also need to use a domain registrar that allows you to create “glue records.” They are what links the IP and the domain name together. For the most part, as long as your provider is not a reseller, you should be good to go.
Why DirectAdmin (DA)?
Most shared hosting companies offer an admin control panel called Control Panel or CP for short. CP is great for beginners as it makes things easy to find. But, that ease of use comes at the cost of performance and leaves you at the mercies of your web host for updates.
I prefer using DirectAdmin to manage my sites. It’s fast, frequently updated and there are updates for the latest PHP and MySQL versions. I’m sure there are more reasons to use DA just as there are more powerful control panel systems available.
Setting up the DNS for a DirectAdmin web server
For this tutorial, we will be using domain.com as our domain name and 12.34.56.78 & 12.34.56.79 for our IP addresses. You will need to replace all three with your own.
- Login to your DirectAdmin control panel and click on “IP management.” You should see the first server IP address already in the list. Enter the second IP addresses one beneath it.
- After entering the IP addresses, go to “User level” and click on “DNS Management.” Enter the DNS records you need for your domain name/host. Most people use the naming convention ns1.domain.com. and ns2.domain.com. for the two name server entries – make sure you include the trailing dot.
- Now we’ll set up the glue record. Using the same name you used in step 2 and the IP addresses you used in step 1, now you’ll need to setup the DNS and name servers for your server with your domain registrar. You’ll need to configure the domain with your “global” DNS (domain) provider as follows (use the two IP addresses you configured within DirectAdmin):
ns1.domain.com -> 12.34.56.78
ns2.domain.com -> 12.34.56.79
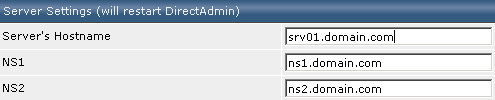
As with any DNS change, these server entries may take 24-48 hours to populate to the Internet. - Log back into DirectAdmin and click “Administrator Settings.” Enter a server name with the field “Server’s Hostname” You can use any letter (a-z), 0-9 and hyphens. I like to use something simple like srv01. Enter the names you used in steps 2 and 3 to fill in the fields for NS1 and NS2.
- Connect to your server via SSH (use Putty) and login as root (sudo) and enter:
nano /etc/hosts
Hopefully, your distro includes the text editor Nano. If not, you might want to use Pico or the more adventurous Vi (check the Linux MAN pages on how to insert text with the editor VI if you need a bit of a refresher). Add the following line to the file:
12.34.56.78 srv01.domain.com srv01
(don’t forget to make the appropriate changes to add your own server and not my dummy one)
Save the file via ctrl+x (confirm to save the file) or :wq if you were forced to edit the file with Vi.
The alternative way to handle your server’s DNS
The main reason why people host their DNS on their own server is because it’s easy. The local DNS Zone is automatically created by the control panel. And, after the virtual host on your server with DA installed is created, you’ll only need to change the name server entries for the specific domain name(s).
There are also reasons to use a DNS zone for your domain names from your domain name provider or a professional DNS provider.
- If your VPS or dedicated server is down, all DNS is down too. If you use, for example Google Apps for your email, you will be able to receive email only for a short time before it goes down too.
- If you move your website to a different server you need to change the nameservers for your domain name too. For several TLD’s does this change take hours.
- A professional DNS provider resolves often much faster than your own server.
- Most providers have a large staff and can more quickly respond to DDOS and other attacks.
There is additional work you’ll need to do to create a DNS zone for each website on your server (local DNS) and the public DNS via the DNS account from your domain name provider. Most service providers are able to provide DNS templates, which make the work much easier and faster. A DNS zone is often a free service from your domain provider. If not or if you like use additional features like virtual DNS, a web application firewall and a CDN for your static files, try Cloudflare. They offer a great service and their free plan is complete enough for most websites.
Published in: Web Hosting
I like DireactAdmin a lot: Easy to use, cheaper than others and it’s very fast!
I used Ensim, cPanel and Plesk and none of them is that powerful as DirectAdmin.
I have the latest version of DirectAdmin, but there is no “IP Management”, “User Level” or “DNS management”.
How can I get acess to DNS management? I’d like to resolve my domain name. For example:
I registered my domain name “brichant.eu” and I when I log in to Direct Admin it states “brichant.eu” as domain name. But I do not see a link to IP Management.
Thanks in advance
Sounds to me that you’re not the owner/admin of that server…
Contact your reseller or the hosting provider.
This tutorial is about how to setup the name servers for a dedicated server (you own).
Why not purchase a managed dedicated server that already has a CP and DNS configured already? No need to try and configure DNS for each site you host. I run HELM CP on Server Intellect managed server. No need to worry about DNS configuration just add the domain and it is live.
@John S
Sure you can buy a managed server and you get some SLA with your machine.
This article is about the first settings you need to do for a fresh dedicated machine. You need to do that “ones” for all dedicated servers even with Plesk and other CP types.
Don’t forget these settings are for the server not for each hosting account. After this is done you need only ~three mouse clicks to create an account in DA.
Thanks for this posting, i have tried 10 days to setup the new server but now it’s up and running thanks to this post!
Thanks for the great article.
I’ve put together a script for DirectAdmin to automatically add and sync domains with Cloudflare. Once it’s set up you can just use DirectAdmin’s dns tools to manage your dns records hosted by Cloudflare.
Very useful if you are managing multiple domains on your server.
I hope it’s a helpful suggestion: https://github.com/pjjonesnz/directadmin_cloudflare_dns
Hello Paul,
Thanks for sharing. What kind of setup do you prefer these days with DirectAdmin?
Nginx + PHP only? (is that possible with custombuild?)
Hey Olaf
Have just moved to a new Linode cloud server and using Nginx for the first time. Very impressed by Nginx. Config was initially a slight learning curve for my WordPress sites, but now that’s done it is easy to add new sites.
Definitely the way to go.
Paul
Hi Paul,
If you’re using Linode for your WordPress websites, try ServerPilot. It’s a different thing because you can’t manage email anymore (which is actually a good thing), but it’s more safe and stable. My move from DA to ServerPilot was the best I ever more than 5 years ago.
If I want to put in the domain test.com -> that points to the DNS: ns1.test.com and ns2.test.com that I have on the same machine, I know how to do it, but what if what I want to put is a second server with another domain test2.com -> pointing to ns1.test.com and ns2.test.com
How would that first server connect with the second so that there are no DNS problems? and when I search for test2.com does it go to the second server?
Hi,
these days (and after moving hundreds of websites) I would recommend to host your DNS with Cloudflare.
It makes no sense to run your own DNS servers. No offense, your question suggests that server management is not your specialty. Use Cloudflare, the DNS option is free and DNS management becomes much easier.